How to Make Your Own Paint

Oil Paint Colour
Now, after the INTRODUCTION TO OIL PAINT, the next challenge is to try making your own!
Oil paints are basically the mixture of pigments and oil. Their popularity is caused by their qualities to dry without changing shape and colour, as well as their archival properties, meaning that the oxidised oil binds the pigments, making it possible to keep the painting intact for hundreds of years.
Making your own oil paint allows you to experiment with the consistency of the paint, as well as the colours. Pigments found in nature can even be used to create your own unique colours.
What do I need to make your own Oil Paint:
- mortar and pestle
- muller and glass slab
- palette knife
- linseed oil ( cold-pressed, raw or unrefined)
- refined beeswax
- pigment(s)
- paint tubes (optional)
The Method
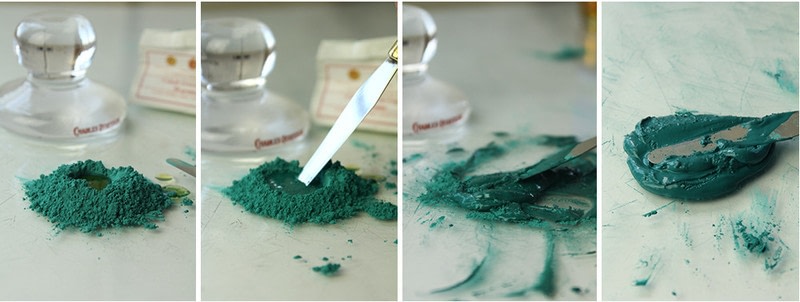
First of all, you will make a small pile of pigment on the glass slab, and make a small gap in the middle. Pour a bit of oil there and start mixing with a palette knife or spatula. Don’t worry if it’s not easy to mix, and only add a small amount of oil at a time, as you want the mixture to have the smallest amount of oil as possible.

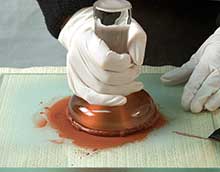
Start grinding the mixture with the muller in a circular motion, spreading the mixture gradually on the slab. The idea is to try covering every pigment particle with the least possible amount of oil. From time to time, scrape the paint off of the muller and start grinding again, spreading the paint. Do this until the mixture reaches a ‘paint consistency’, as it varies from pigment to pigment.
Fillers and Binders used in Oil Paint
Fillers tend to be seen as not good, but they have certain advantages. (the only thing you don’t want is more filler than pigment in the paint!)
Barium sulphate and aluminium hydroxide are two common extenders, which are used to increase the volume of the paint without altering the colour. (it’s advised not to add more than 25%, as it may effect the colour)
Beeswax acts as an emulsifier that helps strengthen the bond between pigment and oil, as well as a thixotropic agent that keeps the pigments evenly distributed.
Storing Oil Paint
You can choose from storing the freshly made paint in a glass jar, or in pre-made paint tubes. The latter will have an open base with a plastic cap on the other end. You can put the paint in with a palette knife and when it’s filled, squeeze the paint in the cap side of the tube in order to get rid of air bubbles. Don’t overfill the tube, as you need to leave a bit so as to roll up the excess. You might want to use pliers to fold it over. When it’s done, label the tube with the media, pigment and date of manufacture.
Videos
- How to make Oil Paint by hand with a palette knife and Muller
- How to Make Your Own Oil Paint – Mix, Bottle and Label
- The Complete Eco-Friendly Artist Oil Paint Tutorial
- How to make genuine flake (lead) white pigment and white oil paint
References
- http://www.earthpigments.com/artists-oil-paints/
- http://www.sinopia.com/How-to-make-Oil-Paint
- http://www.instructables.com/id/How-to-Make-Oil-Paint/
- http://www.artpromotivate.com/2012/07/how-to-make-your-own-oil-paint-home.html
- http://www.paintmaking.com/grinding_oils.htm
- http://www.webexhibits.org/pigments/intro/oil.html
- http://www.kamapigment.com/en/demonstrations/demo1_01.html
- http://www.kamapigment.com/en/information/how-to-make-your-paints.html


